Tuesday, December 24, 2013

HOW TO RECOVER DELETED DATA FROM A USB FLASH DRIVE

0 comments

Follow these simple steps to recover deleted files from your USB Flash drive.

1.If you want to completely restore your important files back, you should stop writing anything else on this USB drive, for any new data would actually erase your original data permanently.
2. Plunge this USB flash drive to your computer and choose a third-party data recovery tool to retrieve your deleted files.
There are plenty of data recovery tools out there. If you want to have much more security of data recovery, you could buy a paid data recovery tool. If you have no extra money for this, don’t worry, you also could download some data recovery freeware online:
http://www.piriform.com/recuva
http://blog4mark.blogspot.com/2012/12/deleted-files-rec...
3. Follow the instructions to retrieve your deleted files back.
4. Back up all your recovered data on a different drive in case of data loss.
NOTE: You are supposed to be more careful about your important data and remember to back it up all the time.
Good luck!

Wednesday, December 18, 2013

WRITE CD USING NERO SOFTWARE

0 comments
You can write a CD using Nero software by following simple and easy short steps.
1. Open Nero software.
2. Select what type of CD you want to make.
3. Insert CD.
4. Add files or folder from your computer
5. Click burn.
6. After completing, it will be ready to use

HOW TO FORMAT YOUR COMPUTER

0 comments
You can format your computer by following these simple steps.

1) All computers have BIOS (Basic input/output system). Here, you can set up how your PC will run. It is a blue colored full screen with different tabs like general, exit, devices and many more. Go to BIOS by simply hitting Del (delete) continuously after restarting your computer.

2) Once in BIOS, look for the booting set up. Listed there are the devices which computer normally boots. ( Hard disk, CD-ROM, Floppy Disk and Network)

3) Place the CD-Rom as the first boot and see to it that the bootable CD of Operating system you want is inserted in the CD-Rom. Then Place hard disk as the second booting device. Third and fourth booting devices are not usually important.

4) Save the changes and Exit. This will restart your computer automatically.

5) When your computer restarts wait until you see a message saying.........
Boot to CD........<----if this showed up hit any key to boot to CD. This will make your computer refer to the CD.

6) They will ask you if you want to delete or to create a new partition. For me just delete the partition and do not create anymore partitions. This will only slows your computer down.

7) After deleting the partitions, they will ask you if you wanted to format you PC. There are 4 choices in there:

a. Quick format (FAT)
b. Format (FAT)
c. Quick format (NTSF)
d. Format (NTSF)

Choose the format either NTSF or FAT. Sometimes quick formatting result to corruption of some files.

8) The computer will copy the contents needed from the CD to your PC and installs it. Windows will appear but i know when you see one you can understand what to do. It will just ask for date and time and user name if you want to.

9) After the installation is complete the computer will automatically restart.

10) Once restarted, set the display in your choice. You can do anything now. Congratulations, you now can reformat PC.


Saturday, December 14, 2013

COMPARISON BETWEEN LINUX AND WINDOWS OPERATING SYSTEMS

0 comments
In the table given below there is short comparison between Linux and Windows Operating Systems .
The comparison is unbiased and depending upon personal observations of  the staff of this blog.

        LINUX VS WINDOWS COMPARISON TABLE


LINUX
WINDOWS
1.       Linux is an open source operating system.
Windows is a family of operating systems from Microsoft
2.       Linux can be downloaded free and can be distributed freely.
Windows cost $50 to $500 depending upon the version of the operating systems.
3.       Very few games available Natively on Linux.
Windows supports almost all games.
4.       Linux has had about 60-100 viruses till  date.
There have been more than 60,000 Viruses in Windows Operating System.
5.       Linux typically provides two GUIs, KDE and Gnome. But Linux GUI is optional
The Windows GUI is an integral component of the OS and it is mainly influenced by Mac OS and Xerox.
6.       Linux file system supports, Ext2, Ext3, Ext4, Jfs, ReiserFS, Xfs, Btrfs, FAT, FAT32, NTFS
Windows File System Supports. FAT, FAT32, NTFS, exFAT


Wednesday, November 27, 2013

HOW TO CHANGE PAGE STYLE IN MOZILLA FIREFOX

0 comments
Go to menu bar.
Click on view as shown in image below.


Click on page style as show in image below.

Now there will be two options
1.No page style
2. Basic page style.
Select your desired option. Thus you can change your page style in Firefox.
If you found this helpful please don't forget to comment below.

Thursday, November 21, 2013

HOW TO CHANGE CASE OF A WORD IN MICROSOFT WORD

0 comments
You can change case of any word, Paragraph, or sentence in Microsoft word at any time by using this simple and easy trick.

Let suppose you have a sentence

 WASEEM NAWAZ ABBASI

PRESS Shift+F3

It will be look like as

waseem nawaz abbasi

Now again

PRESS Shift+F3

Now it will look like as under.

Waseem Nawaz Abbasi

In this way you can change case of your sentence ,word or paragraph in ms word.

Friday, November 1, 2013

GENERAL COMPUTER SECURITY TIPS

0 comments
Don't use e-mail for confidential matters. Unless you take special precautions, there is not much more privacy in e-mail than there is when you send a postcard through the mail.

Choose a password that is hard to guess. (At least seven characters, no dictionary words, use special characters (e.g. @, !, *, $, #) and a mixture of upper and lower case characters). Weak passwords have been one source of computer break-ins on campus recently.

Guard your laptop when you travel. Laptop thefts in airports are on the rise. Don't lose sight of your laptop, especially during airport security check-in.

Back up your data and store backups in a different location from your computer. (It's no accident that this tops the list. One of the single biggest security problems is that data were not backed up.)

Make sure that you are not using unauthorized copies of commercial software. Organizations (including universities) have paid fines for software copyright violations

Change your password frequently.

Make sure your computer is protected from power surges

Obtain the current versions of anti-virus software. 

HOW TO REMOVE VIRUS FROM USB WITHOUT USING ANTIVIRUS

0 comments

STEP1:

  1. After connecting your usb,open command prompt from start-->cmd  
  2. In the command prompt type the drive leter : and press enter [ex: d:]
  3. Now type dir and press enter
  4. List of files in your usb will be shown

STEP 2:

  1. Now open another cmd window
  2. Type the drive letter,but now instead of dir  type  dir /w /a  and press enter
  3. Now files with all the attributes will be shown [even hidden files will be shown ,many virus files will be hidden]
  4. Now match the files with step 1
  5. Any suspicious file may be a virus 
  6. Some examples are
  • Autorun.inf
  • Ravmon.exe
  • New Folder.exe
  • svchost.exe

HOW TO REMOVE THE VIRUS:

  1. In cmd after typing the usb drive letter [ex d:]
  2. Type attrib -r -a -s -h *.* and press enter.
  3. This will remove the Read Only, Archive, System and hidden file attribute from all the files.
  4. Now just delete the files using the command del filename.
  5. Example del Ravmon.exe.
  6. Delete all the files that are suspicious.

RESTORING AND BACKING UP WINDOWS 98 REGISTRY

0 comments

Backing up the Windows 98 Registry

Windows 98 introduced a new utility known as Scanreg, which automatically makes backups of your Registry each time you boot up your computer.
Tip: The steps listed below for backing up Windows 95 Registry also work but are not necessarily needed unless you wish to keep an original elsewhere.

Restoring Windows 98 Registry

To restore Windows 98 Registry, open a MS-DOS prompt.
At the MS-DOS prompt, type cd\windows\command
Once in this directory, type scanreg /restore this will restore an earlier version of your Registry. Once completed, reboot the computer and this should resolve any issues that may have occurred with your Registry.
If you backed up your Registry using the Windows 95 steps use the Windows 95 restore steps to restore the Registry.

BACKING UP THE WINDOWS 2000 REGISTRY

0 comments
The Microsoft Windows 2000 Registry can be backed up from the backup utility by following the below steps.
  1. Click Start, Programs, Accessories, and click backup.
  2. Within backup, click the backup tab.
  3. Within the backup tab, check "System State", this will create a backup of boot files, COM+ Class Registry Database, and the system Registry.
Restoring the Windows 2000 Registry
If you have created backups using the Microsoft backup utility from the backup utility you can also restore the Registry through this utility.

RESTORING THE WINDOWS 7, VISTA AND XP REGISTRY

0 comments
To restore the system back to an earlier point follow the below steps.
  1. Click Start, Programs, Accessories, System Tools, System Restore
  2. Select the Restore my computer to an earlier time option (as shown in the below picture) and click Next
  3. Select the day and the restore point you wish to restore and click Next.
Windows System Restore

HOW TO USE SYSTEM RESTORE IN WINDOWS XP

0 comments

No matter the cause, you can follow these steps to use System Restore in Windows XP:
  1. Save everything.
    Save all files and close all open programs before System Restore restarts your computer.
  2. From the Start button menu, choose All Programs→Accessories→System Tools→System Restore.
    The main System Restore window is displayed.
  3. Choose the option Restore My Computer to an Earlier Time.
  4. Click the Next button.
  5. Choose a restore point from the cute calendar-like thing.
    The most recent date is chosen by default use it unless you already tried it and experienced problems.
  6. Click the Next button.
  7. Read the warning.
    The text warning is in Red. However, you are, good to go.
  8. Click the Next button.
    It should be named Finish because it’s the last step: System Restore restarts Windows XP.
After you log in again, you need to wait a bit more. Eventually, you see a confirmation message explaining that Windows has been restored. You see a window that details what happened; click OK to close the window.
Restoring the system is also a start-up option. Choose the option Last Known Good Configuration, which is more or less the last system restore point.
You can also perform System Restore in Safe mode. That’s a good choice, especially when the computer is unusable otherwise.

TROUBLESHOOTING MOUSE IN WINDOWS 8

0 comments
Sometimes, the mouse doesn't work at all; other times, the mouse pointer hops across the screen like a flea. Here are a few fixes to try:
  • If no mouse arrow is on the screen after you start Windows, make sure that the mouse's tail is plugged snugly into the computer's USB port. (If you have an older mouse with a round PS/2 port instead of a rectangular USB port, you need to restart your PC to bring the newly plugged-in mouse back to life.)

  •  To restart your PC when the mouse doesn't work, press these keys from either the Start screen or the desktop: Press the Windows key and I key simultaneously to fetch the Charms bar's Settings menu. Then press your keyboard’s arrow keys to highlight the Power button near the bottom of the Settings pane. Press Enter to fetch the Power menu, then tap your Up Arrow key to highlight Restart. Press the Enter key to restart your computer.

  • If you own a cordless mouse, the little guy probably needs new batteries.

  • A mouse pointer can jump around onscreen erratically when the mouse's innards become dirty. Clean the mouse's under parts with a moist rag, making sure to remove any debris.

  • If the mouse was working fine but the buttons seem to be reversed, you've probably changed the right- or left-handed button configuration setting in the Control Panel. Open the desktop Control Panel's Mouse settings area and take a look at the setting for Switch Primary and Secondary Buttons. Lefties want it turned on; righties don't.

HOW TO USE SYSTEM RESTORE IN WINDOWS 8

0 comments
To send your computer back to a restore point when it was working much better, follow these steps:
  1. Right-click the bottom-left corner of any screen and choose System from the pop-up menu. When the System window appears, click System Protection from the left pane. Finally, when the System Properties window appears, click System Restore.
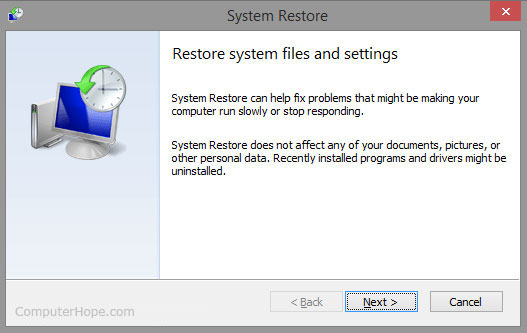
    The System Restore window appears.
  2. Click the Next button at the System Restore window.
    The System Restore Point lists available restore points.
  3. Click a listed restore point.
    You can see more available restore points by selecting the Show More Restore Points check box.
  4. Click the Scan for Affected Programs button to see how your chosen restore point will affect programs.
    A handy touch, this lists programs you’ll probably need to reinstall.
  5. Click Next to confirm your chosen restore point. Then click Finish.
    Your computer grumbles a bit and then restarts, using those earlier settings that (hopefully) worked fine.

HOW TO USE SYSTEM RESTORE IN WINDOWS 7

0 comments
Follow these steps for reverting important Windows 7 system files back to a previous state using System Restore:

  1. Navigate to the Start -> All Programs -> Accessories -> System Tools program group.
  2. Click on the System Restore program icon.
  3. Click Next > on the Restore system files and settings window.
  4. Choose the restore point that you want to use.
    Note: Check the Show more restore points checkbox to see more than the most recent restore points.
    Note: Any restore points that you created, scheduled restore points that Windows 7 created, and those created automatically during the installation of certain programs will be listed here. You can not use System Restore to undo Windows 7 changes to a date that a restore point does not exist.
  5. Click Next >.
  6. Click Finish on the Confirm your restore point window to begin the System Restore.
    Note: Windows 7 will shut down to complete the System Restore so be sure to save any work you might have open in other programs before continuing.
    Important: System Restore will not revert any of your non-system files like documents, email, music, etc. to a previous state. These types files are completely unaffected by System Restore. If your intention with this tool was to recover a deleted non-system file, try using a file recovery program instead of System Restore.
  7. Click Yes to the Once started, System Restore cannot be interrupted. Do you want to continue? dialog box.
  8. System Restore will now restore Windows 7 to the state that was recorded in the restore point you chose in Step 4.
    Note: The System Restore process could take several minutes as you see the "Please wait while your Windows files and settings are being restored" message. Your computer will then reboot as normal when complete.
  9. Immediately after logging in to Windows 7 after the reboot, you should see a message that System Restore completed successfully.
  10. Click Close.
  11. Check to see if whatever Windows 7 problem you were troubleshooting has been corrected by this System Restore.
    If the problem still persists, you can repeat the steps above and choose another restore point if one is available.
    If this restoration caused a problem, you can always undo this particular System Restore.

Thursday, October 31, 2013

TIPS AND TRICKS WORD 2010

0 comments
When working in Microsoft Word 2010, don't forget these handy tips and tricks to get something done quickly or to format your text more in a more pleasing way.
  • Press Ctrl+Enter to start a new page. A manual page break is inserted, which forces a new page automatically.
  • Press Shift+Enter to insert a soft return, which is useful for breaking a line of text, such as in a document title or an address.
  • Use tabs to line up your text. Never use spaces. One tab is all you need. If you’re typing more than one tab, you need to reset the tab stops.
  • Always use one tab between columns to line them up. That makes editing the information easier if you have to do it.
  • If you need to change page formatting in the middle of your document, start a new section.
  • Save your styles in a template! That way, you can use them for new documents you create without having to rebuild all your styles over and over.